



TL;DR
- Successful gameplay in Last War Desert Storm requires perfect macro-coordination, tight teleport control, and knowledge of structural buffs, not just raw power.
- The map layout significantly affects strategy; understanding the differences between the Standard Desert Storm and Desert Brawl is crucial for effective teleport phases and lane assignments.
- Prioritizing the capture of specific structures like the Science Hub, Arsenal, and Mercenary Factory can provide significant advantages in battles due to their buffs and point generation.
Disclaimer: This summary was created using Artificial Intelligence (AI)
To thrive in the cutthroat Last War Desert Storm map scene, you need more than just high-powered hero squads and raw power; you need perfect macro-coordination, tight teleport control, and an intimate knowledge of structural buffs.
As leaders of the R4 and R5 alliances who have stayed up till 3:00AM coordinating server-vs-server wars, we know that raw power can be completely dismantled by a well-disciplined, well-coordinated alliance.
Troops are auto-restored after the match, so Desert Storm (and its upgraded seasonal variant, Desert Brawl) is the ultimate test of pure strategic execution.
We dissect the map layouts, structural priorities, and real-world tactics used by veteran competitive alliances, whether you want to secure the most individual points (IP) or propel your alliance to the top of the Warzone ranks.
See also: Steam Summer Sale 2026: How to Spot the Fake Deals
Map Layouts: Standard Desert Storm vs. Desert Brawl in Last War
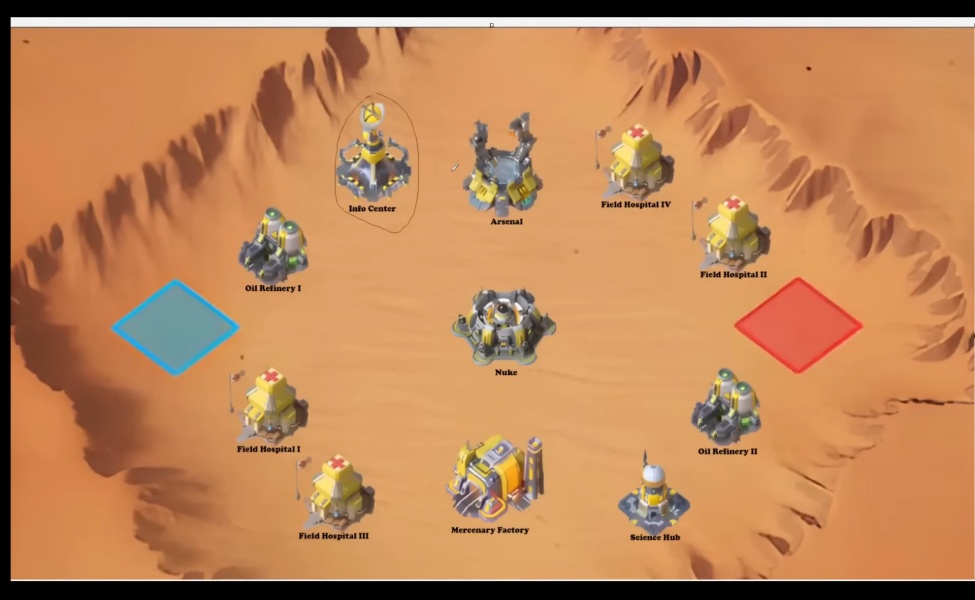
The battlefield changes drastically depending on whether your alliance is playing the standard weekly instance or competing in the seasonal campaign.
Understanding the geography of these arenas dictates your initial teleport phases and lane assignments.

Standard Desert Storm (1v1) Arena
The classic map is a symmetrical, ring-like desert arena that pits two top-32 alliances against each other in a 30-to-40-minute match.
- Spawn Zones: Safe zones are located at the far east (Red) and far west (Blue) edges of the map. You cannot be attacked inside your safe zone, and your base shows up as a green marker to your allies.
- The Outer Ring (Available at 0:00): Consists of 8 structures (4 on the left, 4 on the right) positioned symmetrically. These include Science Hubs, Field Hospitals, and Oil Refineries.
- The Central Conflict Zone (Unlocks at 10:00): The center of the map houses the highest-value structures: the Nuclear Silo, the Arsenal, and the Mercenary Factory. These remain shielded for the first 10 minutes of the match.
Desert Brawl (4-Way Free-for-All)
Introduced as a massive upgrade to the event, Desert Brawl expands the map into a sprawling, chaotic four-way battleground during a 6-week campaign.
- Spawn Zones: Four alliances spawn in the four corners of the map (Northwest, Northeast, Southwest, Southeast).
- Multi-Front Warfare: Instead of a linear push, your alliance must defend two separate flanks while simultaneously projecting power toward the center.
- Expanded Objectives: The map features a larger terrain, expanded Oil fields, and the seasonal Serum Factory, which introduces special combat boosts and campaign-specific currencies.
See Also: Last War Survival Guide, Hacks & Codes for February 2026
Desert Storm Map Building Priority & Point Meta in Last War
Many inexperienced alliances lose matches because they blindly rush the highest point-yielding structures while ignoring combat buffs.
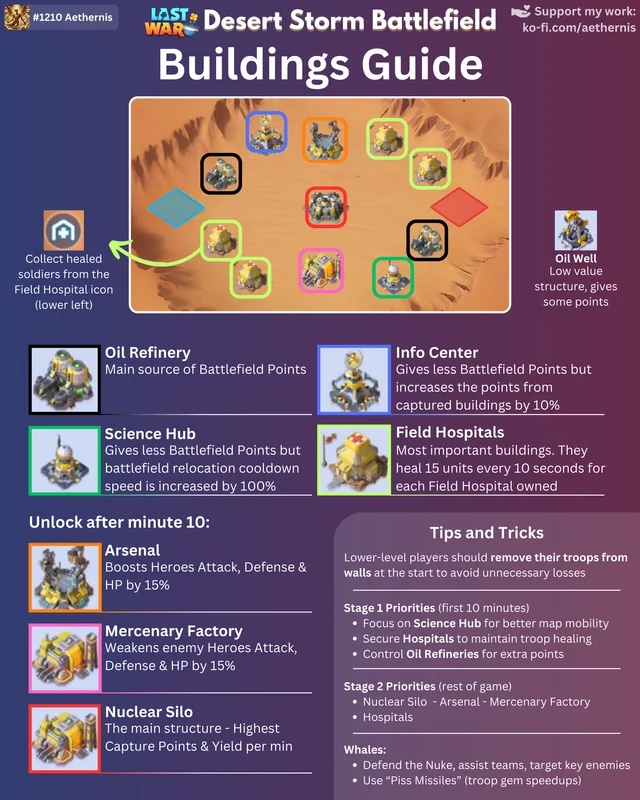
In Last War, holding buffs that allow your whales to wipe out enemy marches is far more valuable than sitting on a point generator with no defensive scaling.
| Building | Unlock Time | Strategic Priority | Key Bonus & Tactical Utility |
|---|---|---|---|
| Science Hub | 00:00 (Start) | Priority #1 | -50% Teleport Cooldown: Reduces port timers from 2 minutes down to 1 minute. This is the mobility king of the map. |
| Arsenal | 10:00 | Priority #2 | +15% Alliance Stats: Boosts your entire alliance’s Hero ATK, DEF, and HP. Essential for winning head-to-head clashes. |
| Mercenary Factory | 10:00 | Priority #2 | -15% Enemy Stats: Debuffs opponent Hero ATK, DEF, and HP, making enemy squads significantly squishier. |
| Nuclear Silo | 10:00 | Priority #3 | Maximum Point Yield: Generates the highest Battlefield Points (BP) per second. Essential for late-game point scaling. |
| Oil Refinery | 00:00 (Start) | Priority #4 | Steady Point Earner: Generates reliable, non-plunderable and plunderable BP. Ideal for secondary teams to hold. |
| Field Hospital | 00:00 (Start) | Priority #5 | Sustain Bonus: Automatically heals 15 units every 10 seconds. Good for saving speedups, but won’t win a losing war. |
| Oil Wells | 13:00–20:00 | Priority #6 | Late-Game Filler: Scattered nodes meant for resource gathering to secure minor incremental points. |
See Also: Last War Hero Tier List 2026: Best Heroes Ranked
Veteran R4/R5 Battle Tactics & Macro Strategy of Last War Desert Storm Map
To run a successful match, divide your active 20-man roster into 4 or 5 dedicated task forces (approx. 4 players per squad) via community tools like the Desert Storm Planner or Discord bots like AllianceSync. Avoid clumped, uncoordinated movements.
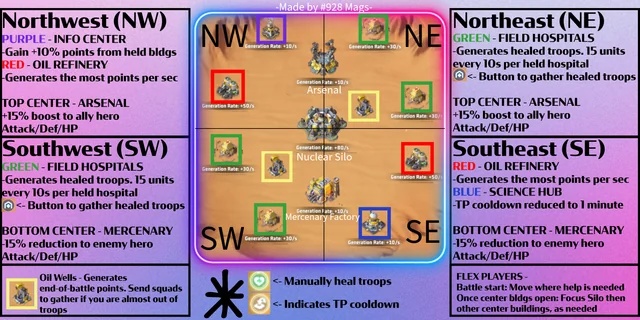
Phase 1: The Opener (0:00 – 10:00)
The match is won or lost in the first ten seconds. The moment the prep stage ends, your fastest players must instantly rush and capture the Science Hub.
The Mobility Meta: Controlling the Science Hub allows your high-power players to “port-hop” across the map every 60 seconds. This mobility allows your alliance to rapidly reinforce contested structures, launch surprise rallies, or escape incoming zeroing attempts.
Simultaneously, secondary task forces should occupy the nearest Field Hospitals and Oil Refineries. If an opponent teleports aggressively into your territory, execute the “Zeroing Tactic”: coordinate immediate, rapid rallies on their base.
When a player’s base defense is destroyed, they are forcibly random-teleported away, completely removing them from the immediate combat zone.
Phase 2: The Central Brawl (10:00 – 25:00)
At the 10-minute mark, the center of the map opens up. Do not blindly throw all your marches into the Nuclear Silo right away. Instead, focus on the Buff Triangle: secure the Arsenal and the Mercenary Factory alongside the Silo.
Holding both the Arsenal and the Mercenary Factory creates a massive 30% stat differential in your favor (+15% to your stats, -15% to theirs). With this buff active, your meta teams (such as the standard all-Tank Kim/Murphy/Mason builds) will easily trade efficiently against superior enemy power, even if they have a slight advantage in tech research or hero stars.
Phase 3: The End Game (25:00 – 30:00)
When a building changes hands, secured points remain with the previous owner, but a portion of “plunderable” points flips to the captor after a 60-second hold.
Furthermore, Point Supply Boxes (visible as small yellow dots on the mini-map) will scatter around flipped buildings.
In the final 3 minutes, execute mass-teleports to enemy-held Oil Refineries and the Nuclear Silo for a desperate, last-second point steal.
Send lightweight scout marches to clean up the scattered Supply Boxes, for instance, free point injections that can swing a close match.
See Also: Best HQ Upgrade Strategy for Last War Survival: Full Guide
The F2P & Low-Power Survival Manual
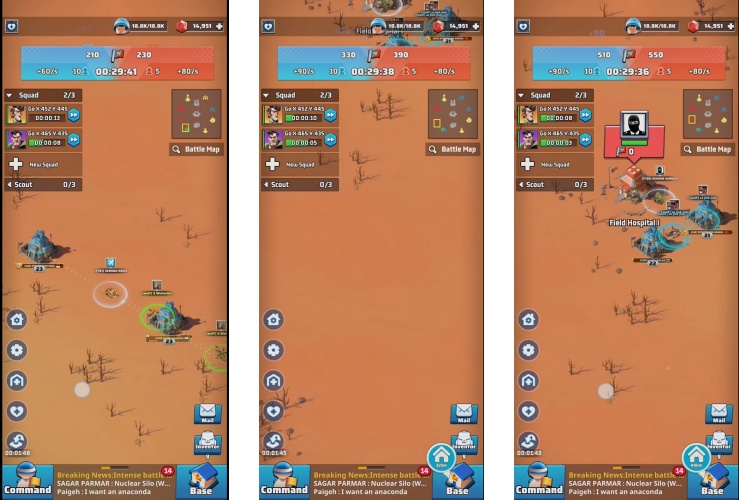
If you aren’t a massive whale with a Level 30 Headquarters and maxed-out UR hero squads, you are still critical to an alliance victory.
Low-power and free-to-play (F2P) players must play smart to avoid becoming free Individual Points for the enemy.
- The Garrison Trick: If your base is under heavy attack and your shield is down, do not leave your troops on your wall to get slaughtered. Clear your wall defense icon and send your marches to Garrison (reinforce) a high-power ally’s base or an active building. Your troops will fight using collective structural defense mechanics, keeping them safer while earning you full participation rewards.
- The Ghost March: To protect your top squads while moving across dangerous terrain, execute a fake rally on a distant neutral or enemy structure with a 5-to-10-minute timer. This locks your troops safely in a “ghost state” within your base, preventing them from being killed if your base gets zeroed while you are looking away.
- Objective Focus: Low-power players should never initiate fights in the center zone. Your job is to occupy scattered Oil Wells, collect Supply Boxes, and act as bodies to hold rear-line Oil Refineries while the whales handle the central combat nodes.
See Also: Pokémon GO 10th Anniversary Event and Rewards Breakdown
The Last War Desert Storm map is a map that takes map awareness, quick decision making and disciplined lane assignments to a perfect mix to master.
Power is important, but coordination, stacking the combat buff structures, and taking advantage of the Science Hub’s teleport cooldown reduction will always allow a disciplined alliance to out-maneuver and defeat stronger opponents.
Keep your alliance fully stocked to sustain your competitive edge in server-vs-server warfare, and always have your squads fully geared.
Out-tech, out-heal, and out-march your foes on the battlefield by dominating the next Warzone event and top up Last War Diamonds easily at Joytify.
See also: Rayman Legends Retold: Can Snowdrop Match 2D Physics?
FAQs
Success requires macro-coordination, tight teleport control, and intimate knowledge of structural buffs. Raw power and high-powered hero squads alone are not sufficient to dominate this map.
Teleport control allows you to position your forces strategically across the map and respond quickly to threats or opportunities. Mastering this mechanic is essential for coordinating attacks and defending key positions.
Structural buffs provide significant bonuses to your units and defenses when you control certain map locations. Knowing where these buffs are located and how to leverage them is critical for gaining the upper hand in server-vs-server warfare.
See also: Zelda Ocarina of Time Remake: Is It Actually a Sequel?
TL;DR
- Successful gameplay in Last War Desert Storm requires perfect macro-coordination, tight teleport control, and knowledge of structural buffs, not just raw power.
- The map layout significantly affects strategy; understanding the differences between the Standard Desert Storm and Desert Brawl is crucial for effective teleport phases and lane assignments.
- Prioritizing the capture of specific structures like the Science Hub, Arsenal, and Mercenary Factory can provide significant advantages in battles due to their buffs and point generation.